Light
Outdoor LED Lighting
Low-voltage path, step, facade and feature lighting, planned around the same grade and hardscape work it lives on so the fixtures read as part of the property, not extras stuck in the lawn.
Chapter 01
A low-voltage system lives or dies on the transformer and the run
Almost every outdoor lighting system worth installing runs on 12-volt low-voltage power, stepped down from household current by a transformer sized to the total wattage of every fixture on its circuit, with room left over rather than run at its ceiling. From there, cable runs out to each fixture, and the cable itself is a design constraint, not just a wire to bury: the farther a fixture sits from the transformer, and the more fixtures share a run, the more the voltage drops by the time it reaches the last one in line. A fixture at the far end of an undersized run doesn't fail outright, it just glows dim and warm-shifted next to a fixture close to the transformer running at full output, and that mismatch is far more noticeable at night than a wiring diagram would suggest.
That's why fixture placement gets decided alongside cable gauge and run length, not after. A property with a long driveway or a deep back lot often needs multiple homerun circuits back to the transformer rather than one long daisy chain, so no single run carries more fixtures than its gauge can hold at full voltage. Getting this right at design time is what keeps every fixture on a property matched in brightness years later, instead of the slow fade where the first few fixtures installed always look brighter than the last few.
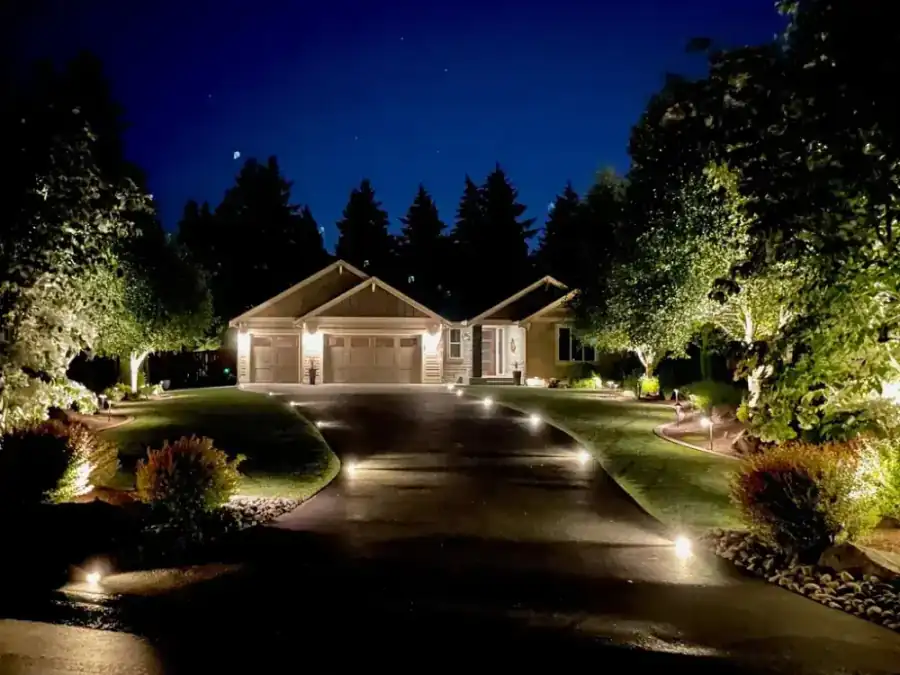
Night driveway and house lighting, full facade uplighting plus path lights
Light the task and the structure first, the lawn second
The instinct on a new lighting plan is often to spread fixtures evenly across the yard, but the properties that actually read well at night are lit by function first. Steps and grade changes come before anything decorative, because a dark tread on a paver staircase or a retaining-wall step is the safety case for the whole system, not an aesthetic add-on. A path needs enough light to walk it without a flashlight, and a driveway needs enough definition at its edges to park without guessing where the pavement ends, and both of those jobs are non-negotiable before a single uplight goes on a tree.
Once the task lighting is placed, structure comes next: a facade uplit along its full run, a stone-clad retaining wall lit along its curve, a specimen tree or an entry pillar picked out as a focal point. Washing an entire wall evenly reads as flat and commercial; grazing it at a low angle from a fixture set close to the base brings out the texture in stone or siding instead of flattening it. The difference between a property that looks lit and one that looks staged is almost always in that choice: light what the eye should land on, and let everything else stay a shade darker.
Chapter 03
Glare control and colour temperature are what make it look built-in
A fixture that's felt and not seen is doing its job; a fixture you can look straight into is a design failure, however bright the effect looks in a daytime photo. Shielding, the angle a fixture is aimed at, and where it sits relative to a walkway or a sightline from the street all matter more than the raw output of the bulb. A path light aimed straight down and shielded at the top throws a pool of light on the ground without ever catching a passerby's eye at head height, while the same fixture aimed carelessly becomes the first thing anyone notices, and not in a good way.
Colour temperature has to stay consistent across every fixture on a property for the same reason mismatched voltage does: the eye catches the difference immediately. A warm white in the 2700 to 3000 Kelvin range is the standard for residential landscape lighting because it reads as inviting rather than clinical, and mixing a cooler-temperature fixture into an otherwise warm system, even one fixture, is enough to make the whole plan look unfinished. This is decided once, at design, and specified across the whole job so it never has to be corrected fixture by fixture later.
Built in with the hardscape, controlled by timer and zone, and why winter is when it earns its keep
The cleanest lighting installs happen while a wall or staircase is still under construction, not after the fact. Wiring a step light or a wall light into a paver staircase or a stone-clad retaining wall while it's being built means the fixture and its conduit are planned into the structure itself, with no exposed cable run tacked along a finished surface afterward. Retrofitting the same fixture onto a wall that's already finished means surface-mounted conduit, a visible cable path, or cutting into work that's already done, none of which look as clean as a fixture that was part of the plan from the first course of block.
Once fixtures are placed, control is the last piece: photocells that bring the system on at dusk regardless of the time of year, timers layered on top for a fixed off time, and zones so a front-entry sequence can run on its own schedule separate from a back patio or a feature wall. In the Pacific Northwest, where winter brings dark by late afternoon and stays dark into a late morning, an outdoor lighting system isn't a seasonal accessory, it's in use more months of the year than it's not, which is exactly why the fixture placement, the shielding, and the colour consistency all matter as much as they do.
Archterra Landscape Services — locally owned and family-operated since 2005, no subcontractors. Call (253) 815-8365.
Lighting a rock wall or a waterfall is its own layout problem
A boulder rockery or a stone-clad retaining wall doesn't take light the way a flat facade does. The same fixture that grazes a smooth wall beautifully can throw hard shadows across an irregular boulder face, so uneven surfaces usually call for more fixtures at lower output rather than fewer fixtures pushed harder, spreading the light so no single shadow reads as a mistake. Water features add a second layer: a light placed to catch moving water at a waterfall or a bubbler needs to be aimed and, where it sits below the waterline, rated for wet or submersible use, which is decided at design time alongside the feature itself, not added once the water is already running.
None of this is guesswork done in the field with a flashlight after dark, hoping a fixture lands right. It's laid out on the same plan as the hardscape and the grading, tested once the sun goes down, and adjusted before the last fixture is buried for good.